
WooCommerce is a powerful eCommerce platform, but sometimes its default settings may not align with your business needs. One common customization store owners require is renaming countries in WooCommerce. Whether you want Country Name Customization for localization, branding, or legal compliance, this guide provides a detailed, step-by-step method to help you achieve this efficiently.
In this article, we will cover:
- Why renaming countries in WooCommerce is important
- Different methods to rename countries
- Step-by-step instructions for modifying country names
- Troubleshooting common issues
- Best practices for maintaining your WooCommerce store
Why Rename Country Names in WooCommerce?
Before diving into the technical steps, let’s explore some key reasons for renaming country names in WooCommerce.
1. Localization and Language Preferences
Some regions have specific ways they refer to their country. For example, changing “United States” to “USA” or “Deutschland” to “Germany” can improve localization.
2. Branding Consistency
If your business operates internationally, you may want to rename country names to align with your brand’s language and style.
3. Political and Regional Sensitivities
Certain regions may have political considerations when listing country names. For example, renaming “Taiwan” to “Taiwan, China” based on business requirements.
4. Enhancing User Experience
Some customers may find official country names confusing or inconsistent. Simplifying them can improve the checkout experience.
Methods to Rename Countries in WooCommerce
There are three primary ways to rename countries in WooCommerce:
- Using a Plugin – Best for non-technical users who want a quick solution.
- Using a Custom Function in functions.php – Ideal for store owners who want a lightweight, customizable solution without modifying core files.
- Hiring Expert WordPress Developers – For businesses that require custom solutions tailored to their specific needs, Topical Developers can connect you with expert WordPress developers skilled in WooCommerce customization. They offer services like theme and plugin customization, speed optimization, and more, ensuring your WooCommerce store operates efficiently.
Let’s go through each method in detail.
Method 1: Rename Countries Using a WooCommerce Plugin
The easiest way to rename countries in WooCommerce is by using a plugin. Plugins allow you to make changes without modifying any code.
Recommended Plugins:
- WooCommerce Checkout Manager
- Custom Checkout Fields for WooCommerce
Steps to Rename Countries Using a Plugin:
- Install and Activate the Plugin
- Go to your WordPress dashboard.
- Navigate to Plugins > Add New.
- Search for “WooCommerce Checkout Manager” (or another suitable plugin).
- Click Install Now and then Activate the plugin.
- Navigate to the Plugin Settings
- After activation, go to WooCommerce > Settings > Checkout Fields (if using WooCommerce Checkout Manager).
- Modify Country Names
- Find the “Billing Country” or “Shipping Country” field.
- Click Edit and enter the new country name you want.
- Save Changes
- Click Save Changes or Update Settings to apply the modifications.
Pros:
✔ No coding required
✔ Safe and easy to use
✔ Can rename multiple countries quickly
Cons:
✖ Some plugins may have limitations
✖ Can add extra load to your website
Alternative Plugin: Aelia for Country Customization
Aelia’s Prices by Country for WooCommerce offers powerful customization options if you’re looking for a more advanced solution. This plugin allows you to rename countries and enables regional pricing adjustments, making it ideal for stores that cater to international customers.
Why Choose Aelia?
✔ Rename and customize country names easily
✔ Adjust pricing based on customer location
✔ Fully compatible with WooCommerce and multi-currency setups
✔ Ideal for businesses selling globally
By using Aelia’s country-based pricing plugin, you get more flexibility compared to basic checkout field plugins, ensuring a better user experience and localized pricing strategies. For more plugin visit Aelia.
Method 2: Using a Custom Function in functions.php
WooCommerce Country Codes: Everything You Need to Know
Country codes play a crucial role in WooCommerce by ensuring the accurate processing of shipping, billing, and customer details. These codes adhere to the ISO 3166-1 alpha-2 standard, which assigns each country a unique two-letter identifier (e.g., “US” for the United States and “CA” for Canada).
When customers provide their address, WooCommerce relies on these country codes to determine the correct country, which in turn allows the system to apply the appropriate shipping fees, taxes, and regional content. This helps to create a more personalized and precise experience for customers based on their location.
For a comprehensive list of ISO country codes, you can refer to a trusted online resource on ISO 3166 country codes.
Key Considerations Before Getting Started
Before we get started, it’s important to understand that modifying the functions.php file can directly affect your theme’s functionality. Be sure to back up your site before proceeding to avoid any accidental changes that could impact your store. The functions.php file is a powerful tool that allows you to add custom code to your site, so it’s crucial to handle it carefully. Once you’re ready, follow the steps below to easily access and modify this file.
Step 1: Open the functions.php File
The first step is to locate and open the functions.php file of your active theme. This is where you’ll add the code snippet to rename country codes in WooCommerce.
- Log into your WordPress Dashboard.

After logging into your WordPress admin, go to the sidebar and click on Appearance > Theme Editor. This will bring up the theme files for your active WordPress theme.
- Locate the functions.php file.
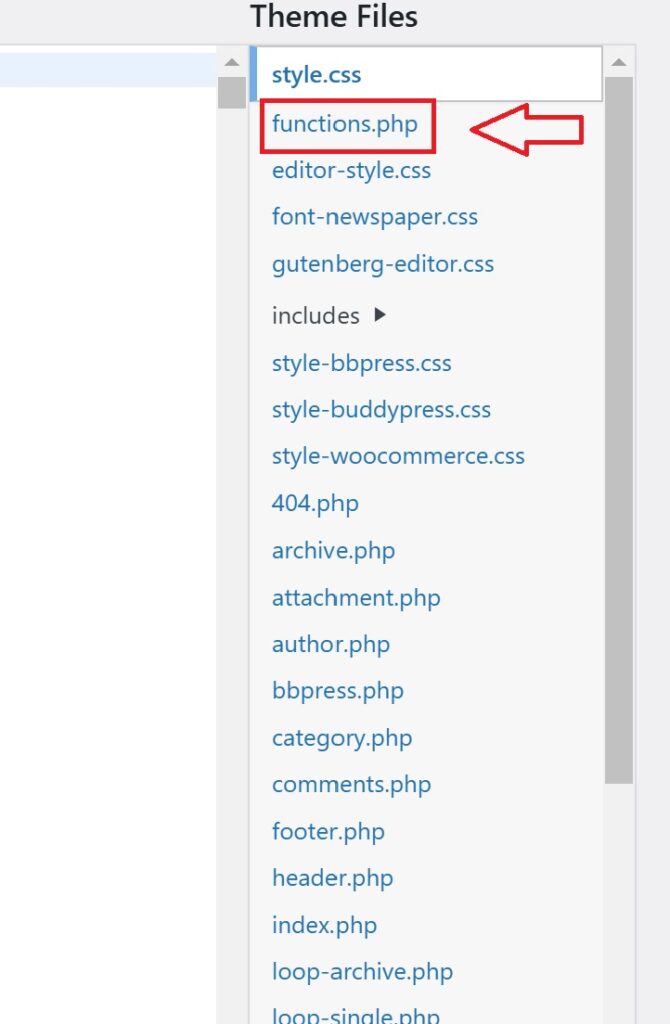
On the right-hand side of the Theme Editor window, you’ll see a list of template files under Theme Files. Scroll through this list and locate functions.php, which is typically labeled as Theme Functions.
- Open the functions.php file.

Click on functions.php to open it in the Theme Editor. This file contains the custom functions for your WordPress theme, where you will add the code snippet.
Step 2: Add the Code Snippet
Now that you’ve opened the functions.php file, it’s time to add the code that will rename a country code in WooCommerce. Follow these steps:
- Copy the Code Snippet Below:
- Paste the Code:

- Scroll down to the bottom of the functions.php file and paste the above code snippet just before the closing PHP tag (if there is one). This ensures that the snippet is added at the end of the file.
Step 3: Explanation of the Code
If you’re not familiar with PHP or WordPress, the code may look a bit complex at first. However, let’s break it down step by step so you can understand how it works.
- PHP Comments
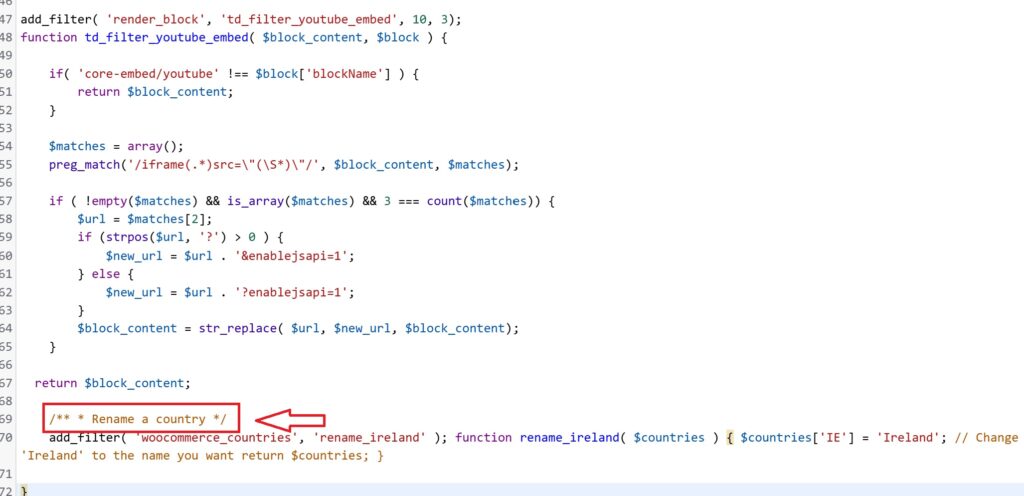
The first lines are comments. These are not executed but simply provide information to the person reading the code. In this case, they explain that this block of code is used to rename a country.
- Binding a Custom Function to the WooCommerce Filter :
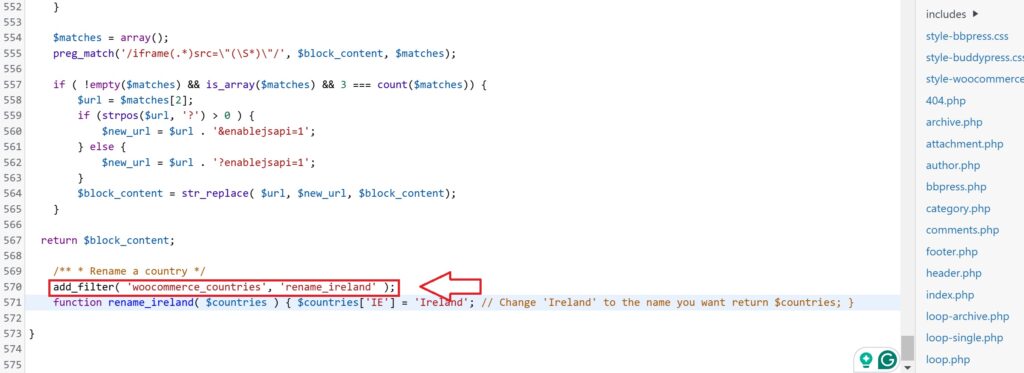
The line uses the add_filter() function to bind a new custom function, rename_ireland(), to the woocommerce_countries filter hook. This hook is responsible for altering country data in WooCommerce.
3. Renaming the Country:
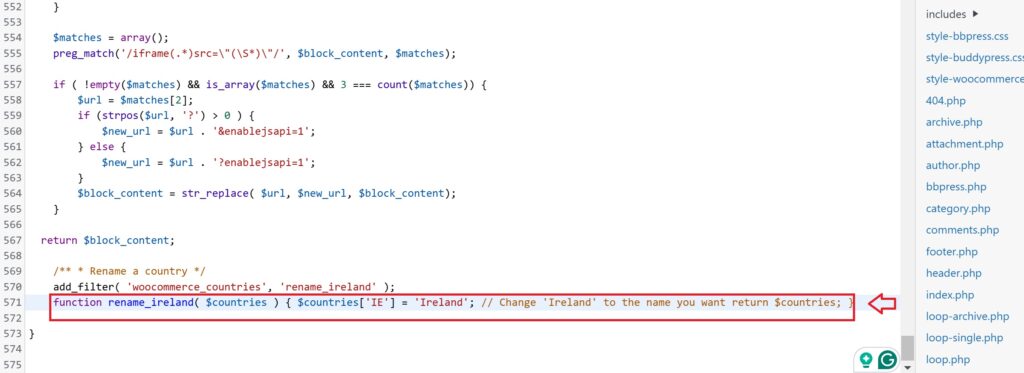
In the custom function rename_ireland(), the country code IE (which represents Ireland in ISO 3166-1) is renamed. The countries[‘IE’] = ‘Ireland’; line is where the country name is modified. You can change the country code and name to anything you’d like, such as renaming the United States or another country in your store.
Step 4: Customizing the Code for Other Countries
To rename a country other than Ireland, you’ll need to make a few small changes to the code:
- Change the Country Code: The country code is a two-letter abbreviation used by WooCommerce to identify the country. For example, the country code for the United States is US, for Canada, it’s CA, and for the UK, it’s GB. You can replace ‘IE’ with the code of any other country you want to rename.
- Rename the Country: The name after the equal sign is what will display on your website. For instance, if you’re renaming “United States” to “USA,” you would change this line to:
php
CopyEdit
$countries[‘US’] = ‘USA’;
- Custom Function Name:

It’s always a good idea to give the custom function a name that helps you remember its purpose. For example, if you’re renaming the United States, you could name the function rename_us or rename_united_states.
Here’s how the code would look for renaming the United States:
php
CopyEdit
/** * Rename a country */ add_filter( ‘woocommerce_countries’, ‘rename_us’ ); function rename_us( $countries ) { $countries[‘US’] = ‘USA’; // Renaming US to USA return $countries; }
Be sure to change the function name in both the add_filter line and the function definition, or it won’t work correctly.
Step 5: Save and Close the functions.php File

Once you’ve added the code snippet and made any necessary modifications, it’s time to save your changes:
- Save the File: After you’ve added the code, scroll down and click the Update File button to save your changes.
- Close the File: After saving the file, you can exit the Theme Editor. Your changes will be live on your website!
Step 6: Verify the Changes
Once the changes are saved, it’s important to verify that the country name has been updated correctly on your WooCommerce store:
- Visit the Checkout Page:
Go to your store’s checkout page and see if the country name has changed in the country selection dropdown. - Test the Functionality:
Add a product to the cart and proceed to the checkout process. Ensure that the renamed country appears in the list and that it is functioning as expected (i.e., shipping rates and taxes should still apply correctly).
Method 3: Hiring Expert WordPress Developers
When it comes to advanced customizations for your WooCommerce store,like renaming countries, streamlining the checkout process, or integrating unique features,there’s no better solution than bringing in an expert WordPress developer. While plugins and custom functions can help with basic changes, professional developers offer the skill and experience needed to implement custom solutions that fit your exact needs.
Why Should You Hire Expert WordPress Developers?
Expert developers bring a wealth of knowledge that can elevate your WooCommerce store, ensuring it’s tailored for your business’s specific requirements. Here’s why hiring an expert is the smart choice:
- Tailored Custom Solutions
You may need custom code or specific tweaks to WooCommerce that go beyond standard plugin offerings. Expert developers can write precise code to rename countries or add any feature you desire, ensuring a seamless experience for your customers. - Seamless Integration
If you’re using multiple plugins for different purposes (e.g., shipping calculators, tax management, or payment gateways), a developer can ensure that your customizations integrate smoothly, avoiding potential conflicts and errors. - Performance & Security Optimization
Professional developers optimize your store not just for speed, but for security. They ensure that the customizations you make, including changes like renaming countries, don’t negatively impact your site’s performance or expose it to security risks. - Flexibility for Growth
Your business will evolve, and so will your website needs. With an expert developer, you gain the flexibility to adapt your WooCommerce store over time as new challenges or opportunities arise. - Localized Customization for Global Reach
If your store caters to international customers, customizing WooCommerce’s country settings to match each region’s preferences can greatly improve user experience. Developers can assist with these customizations, making sure your store is properly localized and compliant with regional requirements.
Topical Developers Can Help You Find the Right Talent

Looking to find the perfect WordPress developer to help with your WooCommerce customization? Topical Developers offers a curated platform that connects businesses with expert WordPress developers who specialize in WooCommerce, theme and plugin customization, performance optimization, and much more. Whether you’re looking to implement simple tweaks or complex functionality, Topical Developers makes it easy to find the right talent.
Explore the top-notch services offered by Topical Developers:
- Browse Developers: Discover a curated network of talented WordPress developers, including those with expertise in WooCommerce. You’ll be matched with professionals who fit your specific needs and project requirements.
- Explore Services: From theme and plugin customizations to advanced security and speed optimizations, Topical Developers provides a range of services that can help you perfect your WooCommerce store.
How to Get Started with Topical Developers
- Visit the Website: Head over to Topical Developers and get a feel for the range of services offered.
- Submit Your Project: Briefly describe your WooCommerce customization needs, whether it’s renaming countries or adding other custom features.
- Get Matched with a Developer: Topical Developers will connect you with the right WordPress professional based on your specific requirements.
- Collaborate with Your Developer: Work closely with the developer to ensure your customization is done exactly the way you want.
- Ongoing Support: Once your customization is complete, you’ll also have access to ongoing support for any future changes or updates.
Hiring expert WordPress developers through Topical Developers ensures that your WooCommerce store gets the attention it deserves, making it more efficient, secure, and user-friendly. Let the professionals handle the complex stuff so you can focus on growing your business.